两年前,第一家公司用过ionic1开发过APP,当时对ionic1了解的不是很熟,今年公司重写APP更换技术框架为ionic3,配合ng4的开发,重新接触ionic app开发后,个人感觉开发上效率比较高,日后有时间会深入研究。下边是APP重写时遇到的一些问题总结。
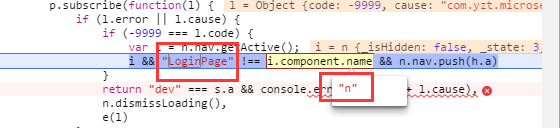
不能使用组件名称作为条件判断依据 为了实现token失效或超时登录,接口拦截请求跳转登录页面,起初我用了组件名称LoginPage作为判断,因为首页请求三个接口,进入首页的时候,三次请求都会判断为token失效,都会跳转登录页面,如果不做当前是否为登录页面判断,都跳转登录页面的话,会出现三次登录页面的重复跳转。
最开始代码为:代码片段1
1
2
3
4
5
6
7
8
if (json["code" ] === -9999 ) {
let curActiveView = this .nav.getActive();
if (curActiveView && curActiveView.component.name!=='LoginPage' ) {
this .nav.push(LoginPage);
}
}
然后改为:代码片段2
1
2
3
4
5
6
7
8
if (json["code" ] === -9999 ) {
let curActiveView = this .nav.getActive();
if (curActiveView && !curActiveView.instance.loginPageModele) {
this .nav.push(LoginPage);
}
}
代码片段1中在debug模式,cordova run android或者cordova build android下都不会有问题。问题在产品模式打包下,加上--prod后缀打包就会有问题。因为代码片段1在–prod模式下代码会被压缩混淆了,组件名称都会改为n了,所有的组件名称都为n,也不清楚为什么都一样。
所以代码片段2为解决方案,组件名称压缩混淆,但是组件实例变量是不会混淆压缩的。
图片的相对路径问题 ionic浏览器开发调式和build打包时路径是不一致的。如果在html页面里边直接写图片路径,就写到assets,比如<img src="assets/ui/certification.png" width="40%" height="40%">;但如果是在scss文件样式里边写,就用../assets/,比如url("../assets/ui/tabs/icon_home_on.png");。这样就能保证手机端和浏览器端都兼容了。
ionic3新增了懒加载机制,@IonicPage() 如果使用命令创建页面ionic g page xxxPage的话,你会发现命令生成一个组件带有xxx.module.ts的文件,这个是配合组件xxx.component.ts里边的@IonicPage()进行懒加载的。
1
2
3
4
5
6
7
8
9
10
11
12
13
14
15
16
17
import { NgModule } from '@angular/core' ;
import { IonicPageModule } from 'ionic-angular' ;
import { CertificationModalPage } from './certification-modal' ;
@NgModule({
declarations : [
CertificationModalPage,
],
imports : [
IonicPageModule.forChild(CertificationModalPage),
],
exports : [
CertificationModalPage
]
})
export class CertificationModalPageModule
懒加载使用也必将方便,组件页面不需要注册,不用在app.module.ts里边declarations了。使用的时候用组件名称字符串替代。比如
1
2
3
4
5
6
7
8
openCertificationModal() {
let myModal = this .modalCtrl.create('CertificationModalPage' , {}, {
cssClass : 'custom-modal'
});
myModal.present();
}
ionic3这个懒加载的特性,在开发的时候,创建页面就直接用起来,省去了很多注册组件的麻烦工作了。
当然,如果是纯组件,就建议使用非懒加载的方式,正常的根据ng2模块注册的方式声明注册。
ModalController自定义弹窗 ModalController是ionic3的API,使用它可以创建一个modal作为弹窗。弹窗是全屏的,不管是android是ios,wp中都是全屏。开发页面的时候,可能需要不是全屏的弹窗,但有不是alert的效果。
这时候有两个选择:
二选一,都可以的。只要时间允许。由于App开发的时候时间很紧,就使用了第二种方式。下边简单介绍一下。
覆盖ion-modal样式要注意不能影响全局,如果样式全局覆盖了,全局的modal弹窗都会受到影响,这就不是想要的接口。ModalController API 提供了cssClass 选项,可以覆盖默认的样式。
1
2
3
4
5
6
7
8
openCertificationModal() {
let myModal = this .modalCtrl.create('CertificationModalPage' , {}, {
cssClass : 'custom-modal'
});
myModal.present();
}
样式
1
2
3
4
5
6
7
8
9
10
.custom-modal {
// transparent black background overlay
background-color: rgba(0, 0, 0, .5) !important;
transition: opacity .25s ease-in-out;
padding: 20vh 10vw;
.scroll-content{
overflow-x: hidden;
overflow-y: hidden;
}
}
最终效果
产品模式下,去掉所有无关功能的代码 APP是团队开发,肯定会有人专门去做公共组件的开发,开发完成后,写demo页面给开发人员参考。demo页面在工程里边的话就要考虑APP打包发布的时候要去掉了。去掉的方式可以很简单规避掉demo代码。根据环境变量判断,是否引入注册相关的demo module就好了。所有demo页面放到一个module.ts里边注册,后期就方便了。
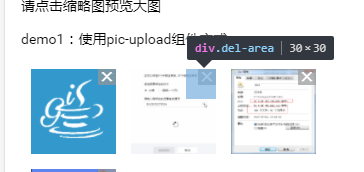
图片组件删除缓冲域 删除X号太小,这时候需要做一个透明的div图层,代理删除点击事件,这样设定DIV的高度和宽度就是点击删除图片事件的点击区域了。
1
2
3
4
5
6
7
8
9
10
11
12
13
14
15
16
17
18
19
.del {
position : absolute;
color : #fff ;
right : 0px ;
width : 18px ;
text-align : center;
background-color : rgba (152, 151, 151, 0.7);
}
.del-area {
position : absolute;
right : 5px ;
width : 30px ;
height : 30px ;
top : 0px ;
z-index : 1 ;
text-align : right;
background-color :transparent;
}
1
2
3
4
5
6
<div *ngFor="let file of fileList;let i = index;" class "pictures" (press)="deletePicture(i)" >
<img src ="{{file.url}}@w_100" (click )="viewerPicture(i)" width ="85" height ="85" />
<div class ="del-area" (click )="delete(i)" >
<ion-icon name ="md-close" class ="del" > </ion-icon >
</div >
</div >
this.platform.ready()是用来监听webView中cordova是否加载了,如果加载了cordova就会执行then后的语句。作用相当于web断的window.onload。
所以所有插件注册调用都要在ready之后操作。不然就会报cordova is not defined错误。cordova只有在非浏览器端才有,所以做如下平台判断在注册就不会报错了。
1
2
3
4
5
6
7
8
9
10
11
12
13
14
15
16
17
18
19
* app初始化
*/
initializeApp() {
this .platform.ready().then(() =>
this .global.set('theme' , 'theme-default' );
this .statusBar.styleDefault();
this .splashScreen.hide();
if (this .nativeService.isIos() || this .nativeService.isAndroid()) {
this .initMsf();
this .registerJPush();
this .registerBackButtonAction();
}
});
}
其中平台判断this.nativeService.isIos() || this.nativeService.isAndroid()方法如下:
1
2
3
4
5
6
7
8
9
10
11
12
13
14
15
16
17
18
19
20
21
22
23
24
* 是否真机环境
* @return {boolean}
*/
isMobile(): boolean {
return this .platform.is('mobile' ) && !this .platform.is('mobileweb' );
}
* 是否android真机环境
* @return {boolean}
*/
isAndroid(): boolean {
return this .isMobile() && this .platform.is('android' );
}
* 是否ios真机环境
* @return {boolean}
*/
isIos(): boolean {
return this .isMobile() && (this .platform.is('ios' ) || this .platform.is('ipad' ) || this .platform.is('iphone' ));
}
打包启动页卡住,需要按HOME键 调式会发现如下错误:
1
Ionic Native: deviceready did not fire within 5000 ms. This can happen when plugins are in an inconsistent state . Try removing plugins from plugins/ and reinstalling them.
网上会有很多相关的问题,都说什么重新移除platform或者plugins,重新安装什么的。试过都不行,然后我调整了一下index.html里边cordova.js的引入顺序,放到了body标签之前就可以了。之前还看到stackoverflow有人建议放到body标签末尾的。。。
安卓物理返回键监听 根菜单双击返回按键,最小化应用,插件ionic cordova plugin add cordova-plugin-appminimize。顺便说一句,如果双击关闭APP的话不需要额外插件,执行this.platform.exitApp();即可。
1
2
3
4
5
6
7
8
9
10
11
12
13
14
15
16
17
18
19
20
21
22
23
24
25
26
27
28
29
30
31
32
33
34
35
36
37
38
39
40
* 返回按钮事件
*/
registerBackButtonAction() {
this .platform.registerBackButtonAction(() =>
let activePortal = this .ionicApp._modalPortal.getActive();
if (activePortal) {
activePortal.dismiss().catch(() =>
});
activePortal.onDidDismiss(() =>
});
return ;
}
let activeVC = this .nav.getActive();
let tabs = activeVC.instance.tabs;
let activeNav = tabs.getSelected();
return activeNav.canGoBack() ? activeNav.pop() : this .showExit()
}, 1 );
}
* 双击退出提示框
*/
showExit() {
if (this .backButtonPressed) {
this .platform.exitApp();
} else {
this .toastCtrl.create({
message : '再按一次退出应用' ,
duration : 2000 ,
position : 'top'
}).present();
this .backButtonPressed = true ;
setTimeout(() =>this .backButtonPressed = false , 2000 );
}
}
IOS 真机click事件不灵敏问题 点击的标签加上tappable属性
1
<ion-item tappable *ngFor="let page of pages" (click )="openMenuPage(page)" >
参考文献
魅族手机cordova-plugin-camera cordova-plugin-camera插件allowEdit属性设置,在魅族手机进入相册选择图片的时候会卡着不动。去掉就可以了。
跳转页面禁止返回 比如退出登录,跳转登录页面后,不能让用户通过物理返回按键返回到之前的页面栈中。使用方式:this.app.getRootNav().setRoot(LoginPage);
使用this.navCtrl.setRoot()会在菜单中嵌入页面,达不到效果。
安装ImagePicker插件失败 偶尔会遇到安装ImagePicker插件失败的情况,很烦,错误提示检查网络连接。实际上不是,使用下边命令即可解决。
cordova plugin install https://github.com/dhavalsoni2001/ImagePicker.git
解决方案来自github,https://github.com/Telerik-Verified-Plugins/ImagePicker/issues/55
1
2
3
So running Ionic cordova plugin install https: //github.com /dhavalsoni2001/ImagePicker.git -> does not work.
but running cordova plugin install https: //github.com /dhavalsoni2001/ImagePicker.git worked for me .
thanks
后期作者修复问题可能就不存在了。
微信公众号
未完待续……